|
|
|
| This document is available in: English Castellano Deutsch Francais Italiano Turkce |
![[Photo of the Author]](../../common/images/EricLamarque.jpg)
by Eric Lamarque <eric_lamarque/at/yahoo.fr> About the author: User of Linux since 1999! Translated to English by: Guido Socher <guidoatlinuxfocus.org> Content: |
GIMP: Make your own brushes![[Illustration]](../../common/images/article314/brosse.jpg)
Abstract:
In this article I will present the various brushes that GIMP offers and
show how to create brushes. |
 |
|
| Reset the colors of foreground (FG) and background (BG)
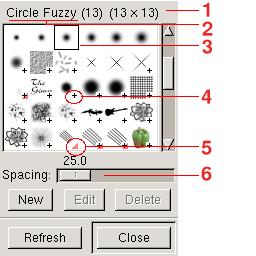
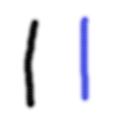
to black/white. Select the brush "Circle Fuzzy (13)" and
draw a line with the paintbrush tool. Change the color of
foreground to blue and draw a second line. Impressing!! It's a simple brush. The brush in this case is a grayscale image used by Gimp as an inverted alpha channel. The white corresponds to the transparent color and the levels of gray are used as value for the foreground color. The file associated to the brush has the extension ".gbr". |
 |
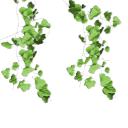 |
Set again the colors of foreground and background to
black/white. Select the brush "Vine" from the "Brush
Selection" dialog. Change the foreground color to blue and
draw something. You note: you wanted vine in blue but it remained green. "Vine" is a RGB pipe or animated brush: it is not possible to change the color in this type of brush. On the other hand, the image evolved/moved while you draw. The associated file type for this brush has the extension ".gih". |
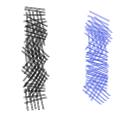
| Reset the colors of foreground (FG) and background (BG)
to black/white. Select the brush "PencilSketch" and draw.
Change the color of foreground into blue and draw a second
line. Ah finally! This starts to resemble something! "PencilSketch" is a pipe "alpha". In addition to drawing with the color of foreground, the brush changes during the drawing. The file type associated with this brush has also the extension".gih". |
 |
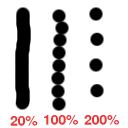 |
Change "Spacing": Reset the colors of foreground (FG)
and background (BG) to black/white. Select the brush
"Circle(13)", set spacing to 20% and draw a line. Set spacing to 100% and draw a second line. Set spacing to 200% and draw a third line. This experiment shows the influence of spacing on the brushes. For decorative brushes ("Guitar "or" Pepper"), one will generally choose a spacing of 100%. |
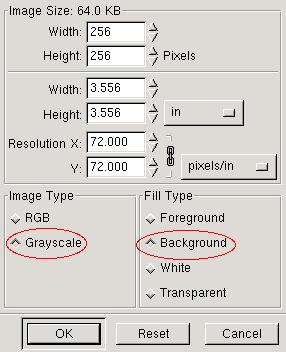
| Reset the colors of foreground (FG) and
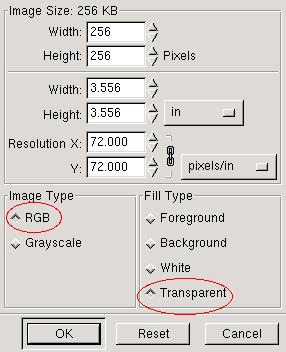
background (BG) to black/white. Open a new image
(File->New) with image type gray and fill type
background. Trick: Do not hesitate to create an image larger than the size of the desired brush: it is easier to work on a big image and then reduce than to make the brush in real size. For the example, the image with a size of 256x256 and will be reduced to 64x64. And now, using some imagination, you just have to create the brush of your dreams. For the example, I drew a boat. Trick: If you want to obtain a brush with soft contours, use the filters "Blur" from the right click menu. |
 |
 Your master piece is ready.
Here an outline of my example already reduced to 64x64.
Your master piece is ready.
Here an outline of my example already reduced to 64x64. 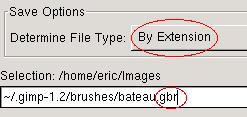
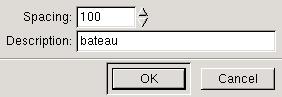
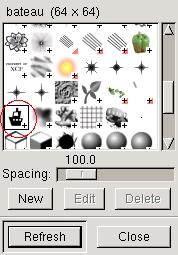
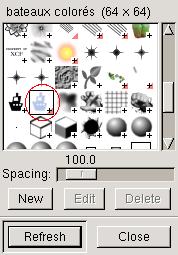
| And ready is the magnificent and
decorative brush. But it does not appear in the dialog
"Brush Selection". Press the refresh button and it becomes
available. You can now use your brush.  |
 |
| A pipe - or animated brush - is a brush
which contains several images. The image of the brush
varies at the same time as one draws: it is the experiment
we did with the brush "Vine" in the first part. In GIMP, the creation of a brush of this type is an image with several layers. NOTE: Only the brush "pipe" can have colors (RGB). If you want a fixed brush color (like "Pepper"), you will have to create a pipe with only one layer. This is what you do: create a new image RGB with "fill type" transparent. Hint: Do not hesitate to create an image larger than the size of the desired brush: it is easier to work on a big image and then to reduce than to make the brush in the final size. |
 |
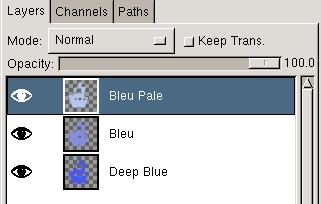 |
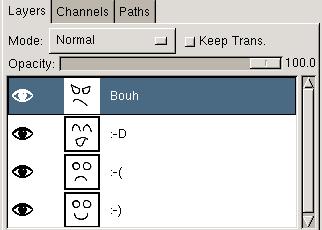
Your master piece is ready. Here a
screenshot of the layers from the example: a boat with 3
colors. If you think of wanting to modify/re-using the elements of your image later on, then save it now as .xcf : the creation of the brush is an operation with single direction. Once the file "gih" is generated, one loses the original elements of the work in progress (layer, path, channels...). |
 |
|
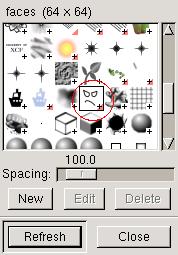
| It is done: now you have a new animated
brush. But it does not appear in the dialog "selection of
brushes" until you press the refresh button. You can now use your brush.  |
 |
| A "alpha" pipe is an animated brush which
contains several images of the type grayscale. The brush
"PencilSketch" is of this type. In GIMP, we need to create an image with multiple layers and image type "Grayscale". Reset the colors of foreground (FG) and background (BG) to black/white. Create a new image of type "Grayscale" and set fill type to "Background". |
|
 |
The master piece is ready: four different
expressions of a face. If you think of modifying/reusing the elements of your image later on, it is the moment to save now as .xcf or never come back : the creation of the brush is an operation with a single direction. Once the file ".gih" is generated, one loses the original elements of the work in progress (path, channels...). |
 |
|
| It is done: now you have a new animated
brush. But it does not appear in the dialog "selection of
brushes" until you press the refresh button. You can now use your brush. 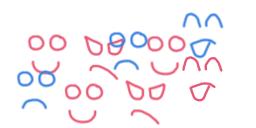 |
 |
 |
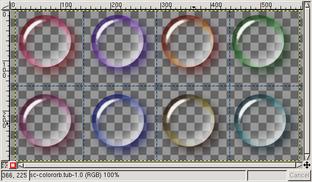
Open the file in GIMP. Even if the
extension ".tub" is not mentioned explicitly in the type of
files, the format Paint Shop Pro ("PSP") is supported. |
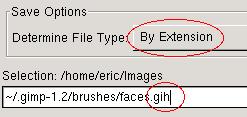
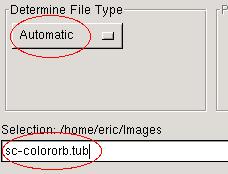
| You should now have an image containing
eight bubbles colored on a transparent background. Save the image under the name "sc-colororb.gih". |
 |
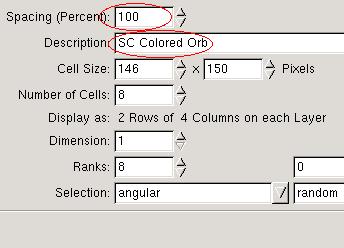 |
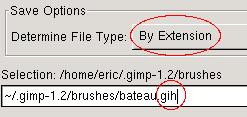
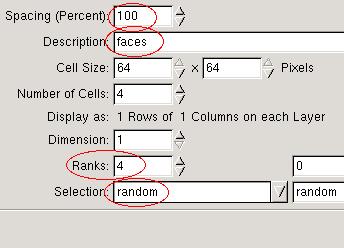
I marked in red circles on the left side the fields you
need to modify:
The number of rows and the selection are also converted (8 rows - angular selection). |
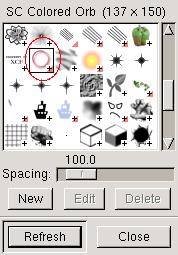
| Save the file with these settings and copy
sc-colororb.gih to ~/.gimp-1.2/brushes/. In the dialog "Selection of brushes", use the button "refresh" and your new brush is accessible. You can now use your brush. 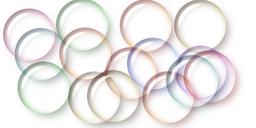 |
 |
|
|
Webpages maintained by the LinuxFocus Editor team
© Eric Lamarque, FDL LinuxFocus.org |
Translation information:
|
2003-10-10, generated by lfparser version 2.38